Tag Archives: game day snacks

Garden Fresh Salsa

So this is the first year with my new greenhouse and I tried to be very strategic with my planting and the tomatoes and green peppers have been LOVING it! It’s been a delayed year for ripening, but they are starting to come on heavy now. I’m trying to get creative in what I use the produce for because we don’t need to end up with 30 pasta sauces again. I’m trying different types of tomato sauce, Indian sauce and now fresh salsa! Thanks to the USU Extension Facebook posts I learned that there is actually only one salsa recipe that is approved for canning because the balance of acidity is ideal to avoid botulism. That is too much pressure for me (plus I don’t know how to can produce) so I am going to stick with fresh salsa that will keep in the fridge for about 10 days.

I actually had some Serrano and Jalepeno peppers that were going red so I used them to make a batch that was on the hotter side. But you can always control the heat of your salsa by cleaning out the peppers before adding them. Remember, it’s not the seeds that hold the heat, but it’s the pith (the part that the seeds are attached too) that holds the spicy compound.

I used a combination of Roma and Bushsteak tomatoes, so you can use whatever looks good in the garden or in the store. I used a very long thin knife to scrape out all the juicy seed parts of the tomatoes and just used the fleshy parts so that the salsa wasn’t too watery. One of the great things about salsa is how customizable it is to taste! Don’t like spicy? Clean out or omit the hot peppers. Don’t like cilantro? Leave it out. Like different kinds of peppers? Add them! Want bolder flavors? Add more spices or roast some of the veggies.

So here is what I did! This made about 4 cups of salsa.

Ingredients:

  • 5-6 Medium Tomatoes, quartered and de-seeded
  • 1 Medium Red Onion, cut into large chunks
  • 1 Medium Yellow Onion, cut into large chunks
  • 1 Large Green Pepper, quartered
  • 4 Cloves Garlic
  • 2-3 Medium Jalepenos, halved and seeds and pith cleaned out for less heat
  • 1 Serrano Pepper, halved and seeds and pith cleaned out for less heat
  • 1/3 of a Bunch Fresh Cilantro (about 1 cup)
  • Juice of 1 Lime
  • 1/2-1 tsp Sugar
  • 1-2 tsp Salt
  • 1 tsp Cumin
  • 1/2 tsp Smoked Paprika

In a food processor add the onions, peppers, garlic, cilantro and lime juice. Pulse to chop a few times. Add the tomatoes and seasoning. Pulse a few more times to get the consistency you like. I prefer a fine chop, but not pureed. Do a taste test and add more seasoning to taste. 

Let the salsa chill in the fridge for a few hours to let the flavors mingle and develop. 

Store in an airtight container for up to 10 days. 

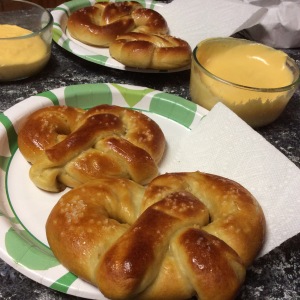
Soft Pretzels and Cheese Sauce

So I know that I don’t post a lot of snacks, but here is a great one for any lazy Saturday afternoon. Or the upcoming big game day! What is your favorite finger food? Give me some ideas to create a game day snack board!

Levi and I love soft pretzels! We always stop at Pretzelmaker in the mall, and Levi has been talking about trying this out for a long time! So one of my rare Saturday’s off we had sometime and very few house projects that could be accomplished in a day. So we had an awesome snowy day baking and doing taxes and just hanging out 🙂 It was wonderful! I am so glad that we tried them because they are light and fluffy and salty and amazing!!

The first time you try these out I would carve out some time to make sure you get all the steps right. But now that I’ve done it, the process seems more simple than I had anticipated. I am also not super happy with the cheese sauce, so here is what I have. It’s not horrible but I know I can do better next time. I’ll update it once I have a new idea.

This recipe makes 6 pretzels. So make the necessary adjustments for the crowd you are trying to please.

Ingredients:

For Pretzels

  • 1 1/2 Tbsp butter, cubed and room temperature
  • 1 Tbsp Brown Sugar, packed
  • 1 1/8 tsp Active Dry Yeast
  • 3 Cups Flour (I used half all purpose and half bread flour)
  • 1 tsp Salt
  • 2/3 Cup Baking Soda
  • Coarse Sea Salt for sprinkling on top and melted butter for brushing on top

For Cheese Sauce:

  • 1 Tbsp Butter
  • 1 Tbsp Flour
  • 2/3 Cup Milk
  • 4 oz Cheddar Cheese, shredded. I’ve heard that shredding your own makes a big difference over buying pre-shredded.

In a stand mixer combine the butter and brown sugar with 2 cups of hot water (110-115 degrees). Add the yeast and let stand for about 10 minutes until it gets foamy. It’s best to let it sit in a warm environment. I had warmed up the stove just a little bit and set it in there.

Add 1 1/2 cup flour and salt to the yeast mixture. Using a dough hook mix on low speed. You may have to scrape down the sides a few times to get the flour to start incorporating. Increase to a medium speed and add the rest of the flour. Mix until the dough starts pulling away from the bowl.

Move the dough to a clean, floured surface and knead the dough for about 5 minutes until it’s smooth. Brush the inside of a bowl with butter and place the dough inside a bowl and cover with plastic wrap. Let the dough rise for an hour. Dough rises the best in a warm and moist environment. I boiled some water and placed it in a baking dish on the bottom rack of the oven and place the bowl on the rack above it.

Let the dough rise for 1 hour until it’s doubled in size.


Remove the dough from the bowl and punch it down. Cut the dough in half and cut each half into 3 equal pieces.

Take a cookie sheet and line with wax paper and coat with cooking spray. Measure out a 24 inch space. You can use a piece of string or the measuring tape to help ensure that your ropes are all the same length. Roll out the dough, occasionally hold each end and twirl the dough around kind of like a jump rope and slap the middle against the counter. This will help it stay stretched out.

To make the pretzel shape lift each end to make a U shape, cross the ends over each other once or twice and fold the ends down over the bottom. Place each pretzel on the cookie sheet. Cover loosely with plastic wrap and place back in the oven with more boiled water for about 30 minutes. They will puff up slightly.
  

Preheat the oven to 425 degrees. In a large pot mix 10 cups of water with the baking soda. Bring to a simmer. Use scissors to cut the parchment paper around the pretzels. Slide the pretzels off the baking sheet and coat the baking sheet with cooking spray. 2 at a time carefully invert the pretzels in the water and use tongs to remove the wax paper. Simmer the pretzels for 45 seconds on each side. Remove with a slotted spoon or a large spatula and slightly shake off the excess water. This step will help you get the dark brown pretzel color while maintaining a soft and chewy bread.

Once your pretzels are ready for the oven sprinkle them with coarse salt. Bake for 12- 15 minutes, rotate the baking sheets halfway through. Remove from the oven and brush with melted butter.

While the pretzels are baking use a small sauce pan and melt the butter and add the flour. Mix with a whisk until you have a light brown color. Very slowly whisk in the milk. Gently simmer until the sauce starts to thicken, 2-4 minutes. Remove from heat and add the cheese, stir until all the cheese is melted. Serve immediately.

I bet you could make these the day before and put them in the fridge and then pop them in the oven again on game day! But I would make the cheese sauce fresh.

I am also going to try these with cinnamon sugar and a cream cheese frosting!! I really hope you all give them a try. They are fantastic!!!

img_0048


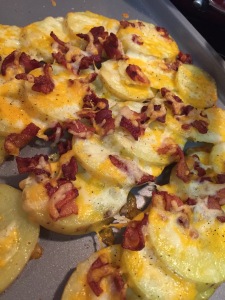
Baked Cheesy Bacon Potatoes 

Baked Cheesy Bacon Potatoes


Potatoes, cheese and bacon….need I say more? Perfect little side dish and it’s really pretty quick to throw together while your main dish is cooking.

We had such a fun day on Sunday! We had our regular breakfast at Angie’s, did our weekly grocery shopping, made Strawberry Almond Banana Bread, and created this super beautiful Spring wreath!!

Spring Wreath

So I know what most of you are thinking….but you guys have been eating so healthy!! And we still are. But we are not on “diets” And I firmly believe that you need to find a balance in your food in order to have a healthy lifestyle. That means sometimes you just want a cheesy, bacon-ey plate of goodness! We had these as a side for Turkey Burgers! And of course some corn on the cob. I mean c’mon, it’s summer!

For those sports fans out there, this would probably be a crowd pleasing game day snack! You can add jalapenos, chives, sour cream, ranch or a whole host of yummy toppings!

We just made enough for 2 so adjust the recipe as needed.

  • 2 medium potatoes- Sliced to 1/4 inch thick
  • 1/2 cup Colby Jack Cheese, shredded
  • 2 Slices of Bacon, cooked and crumbled (save the grease)

Put the potato slices into a medium saucepan filled with water. Bring it to a boil. Let it boil for 5 minutes.

Preheat oven to 375.

Drain the water and pat the slices dry. Arrange them on a baking sheet. Lightly brush some of the bacon grease on the potatoes.

Cover with your bacon and cheese. Bake for 12-15 minutes.

And enjoy!!!

Nom Nom Nom 🙂